
Want more tips? Check out my free e-course and learn to Piece Like a Pro with me!
While a lot of quilts can be made without using an accurate 1/4″ seam, if you are following a pattern, the best results come with accurate seams. Today I’m sharing a good method for finding accuracy for you and your machine!
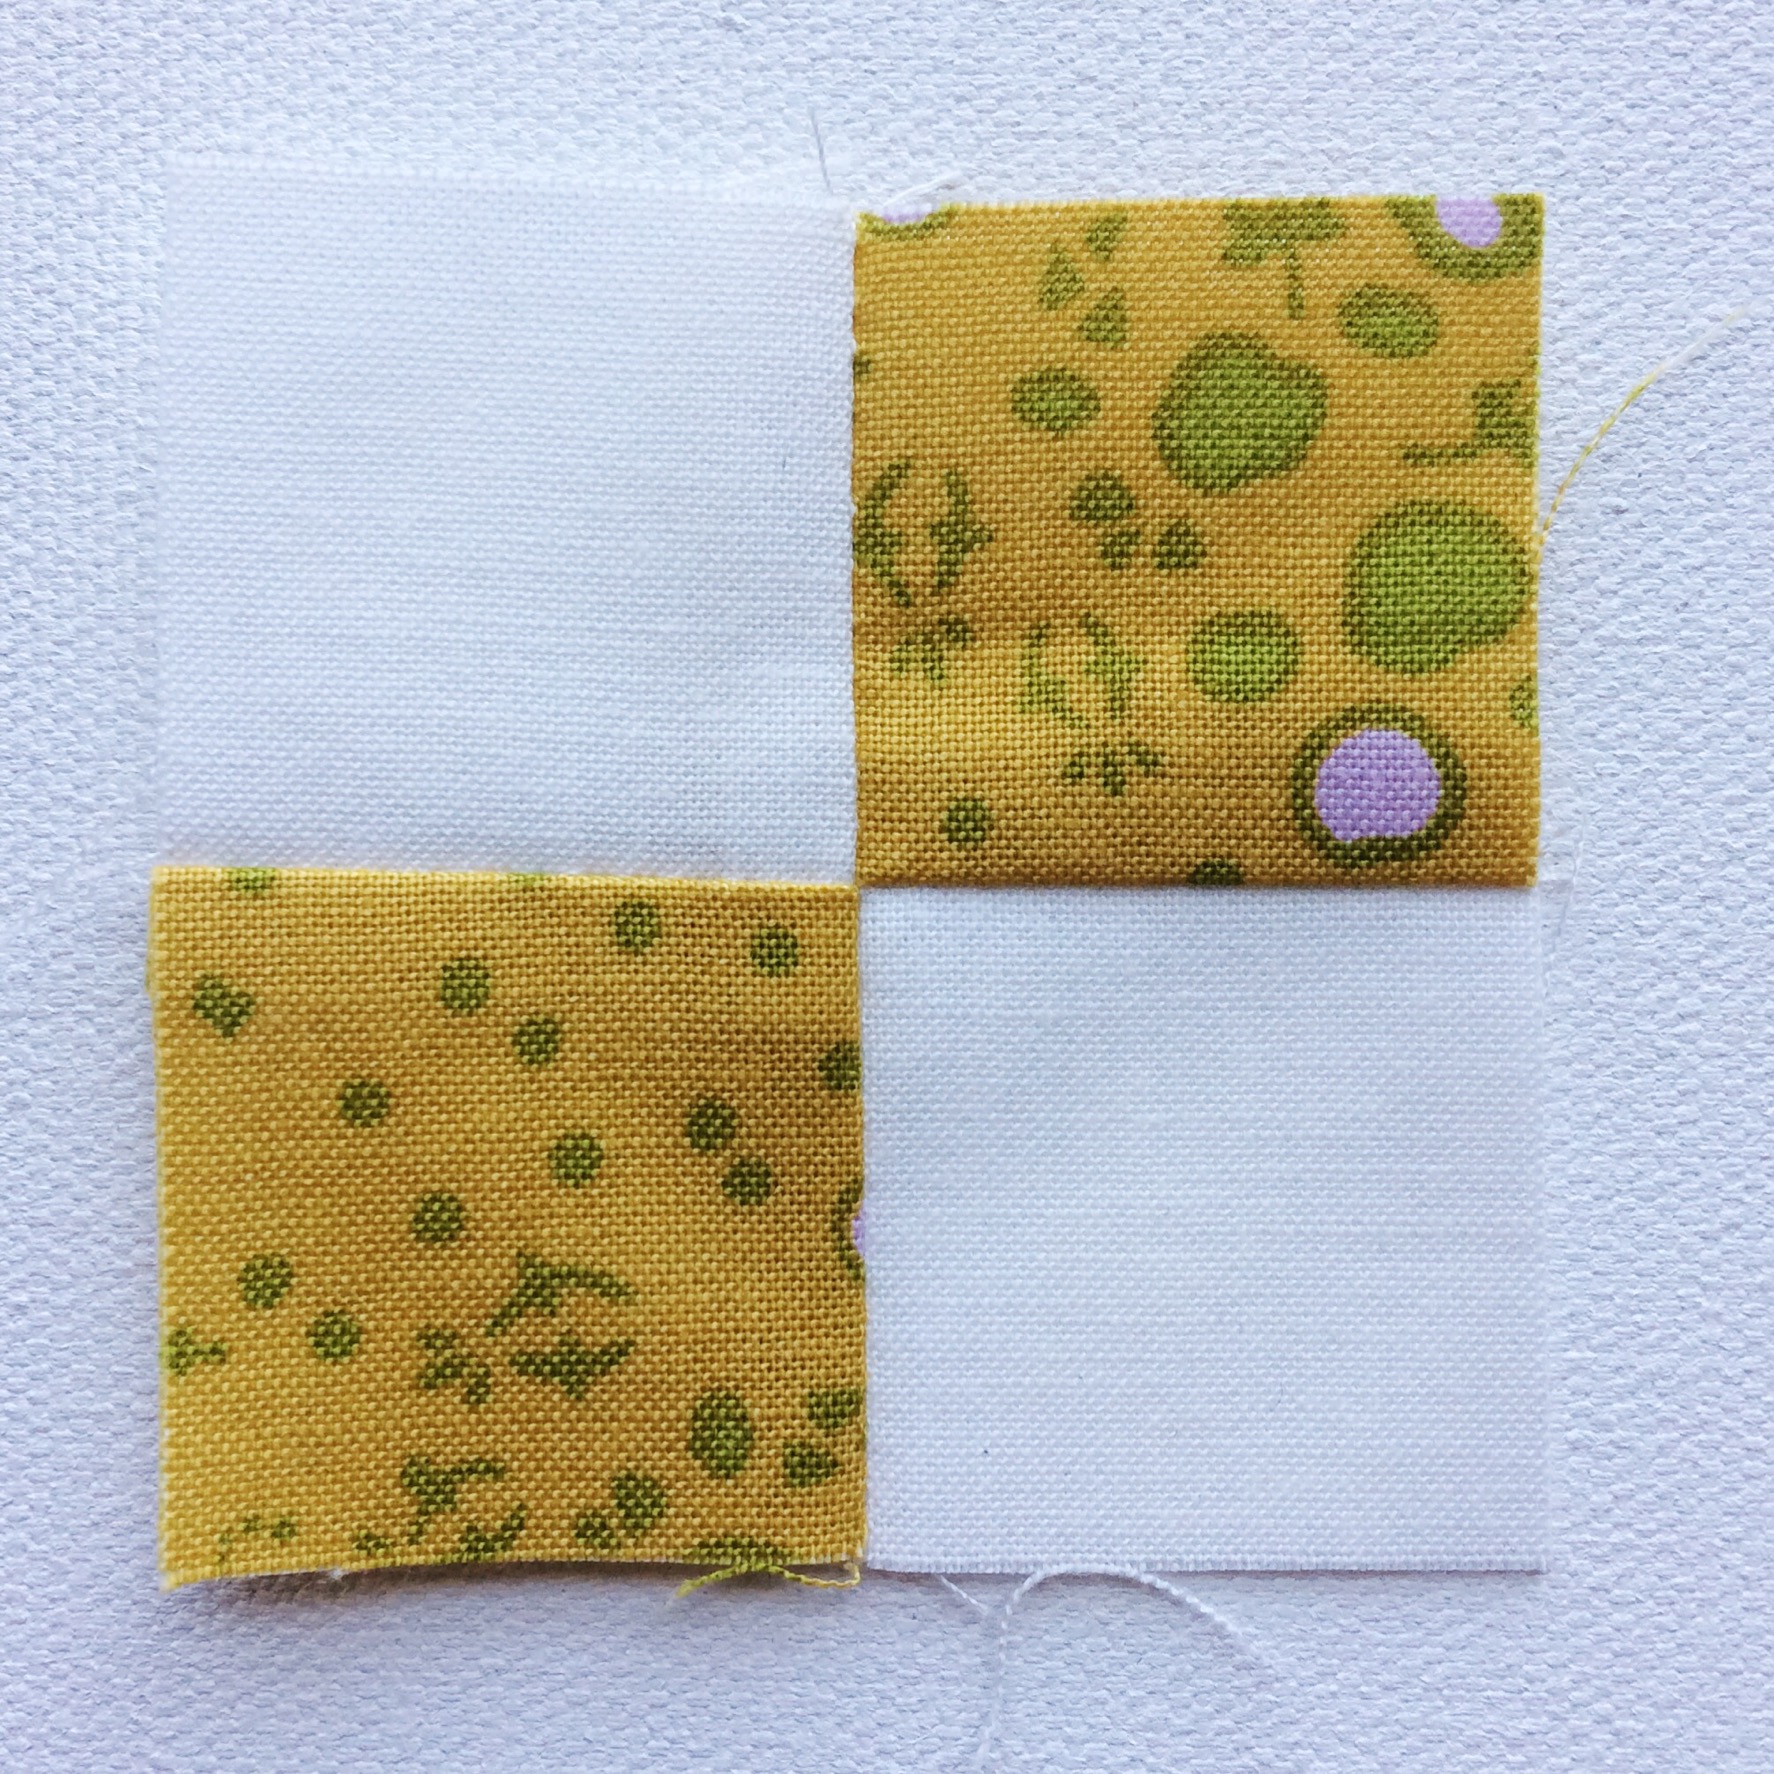
My best example of an inaccurate 1/4″ seam is this block –

I love this block, but that tiny white strip was not in my original plans. I did all the math, worked out all the details for a perfect 12 1/2″ x 18 1/2″ block, just before adding the last row – I measured. Thank goodness! I then calculated the needed piece, added it, and vowed to get my 1/4″ seam accurate!
Here’s what I’ve learned, and how you can achieve an accurate 1/4″ seam.
These are the sewing machine feet I’m using, a 1/4″ foot, and a standard foot with a wide needle opening.

Cut a few strip sets, at 2 1/2″ wide, mine are 5″ long.

Verify that your foot is attached tightly, or it may be wobbly.

Put your fabrics under and sew. My fabrics are lined up and butted against the rail on the side of the foot.

Now set your seam and press. Yes, I like to press open, and in this case it lays nice and flat for the next step.

Measure your set. It should measure 4 1/2″ exactly.

See how that little bit could add up in a block, like my example?

Let’s make a small adjustment, and try again. These are my standard settings, when I turn on my machine –

Here’s the adjustment – move the needle .5 mm to the right –

Sew another strip set, set and press the seam, now to measure!

Exactly 4 1/2″, and the seam is at 2 1/4″ – an accurate seam!! Here’s a closer look –

But I know that not everyone has that nifty little foot – so let’s look at the regular foot. Grab your ruler and masking tape, and set down with your machine.

Put your needle down and measure 1/4″ away.

Gently lay down a piece of tape, 1/4″ away from the needle.

See the problem here? It’s covering the feed dogs – not a good thing. You always want your fabrics to feed evenly through the machine, and they may get sticky if you piece a lot. My foot has lots of room for the needle to move, so that’s what I’m going to do!
ETA: You could test this placement, then when accurate, mark it on your bobbin cover with a permanent marker. Especially helpful if your needle doesn’t move in so many increments like mine.
I moved the needle to the right 2.0 mm – I’m just guessing here, it’s all about trial and error with your machine!

Put your needle down again to measure and mark your 1/4″ with tape.

Notice that the tape seems to line up with the edge of my foot!? Sew a strip set together, set and press your seam to measure it.

It’s really close again, but not exactly 4 1/2″. One minor adjustment should be all that is needed! I moved my needle to the right just .5 mm once again.

Sew, set and press a strip set, and then measure, again. Success!

Looking at it slightly closer again, it measures 4 1/2″ and the seam is at 2 1/4″ – accuracy!

I realize that not everyone has as nice of a sewing machine as I do, you can make this work for your machine, learn about the different needle positions and feet. There’s a good combination for the two of you too! It took me about 10-15 minutes to work out both of these methods for my machine, a little time well spent, and full of rewards as you piece your next project.
**I should say that the middle of a project is not the right time to change your methods – consistency for this project is good, and accuracy for the next one is great!
I hope that this is helpful! Anyone have anything else to add? Questions? I’ll answer them in the comments for everyone :)
Happy Quilting!
Amy
What a great post!! Thanks so much for the tips – I'm off to figure out the needle position for my machine as I have the 1/4" foot and I have noticed that I'm just a skoosh off but it's "worked" so far. Although it's been an annoyance. Thanks for your post as it was timely as I was starting to get annoyed as to why my blocks were never "perfect"!
Nice demo! When I took beginning quilting classes many years ago at our local quilt store, we learned the importance of this 1/4" seam in quilting. I don't have a digital machine, so I don't have the ability to move my needle like that. In class, we were taught to use the tape method. But if it covered our feed dogs, we laid down the tape and made a mark with a black sharpie. That mark became our 1/4" seam guide. Worked great!
I agree with you about accuracy. It definitely takes the frustration out of matching seams. It looks like I have the same machine as you as I also adjust for accuracy as you showed in your demo. Works great! Thanks for sharing.
I had to share this great tutorial with Craft Gossip readers here
http://quilting.craftgossip.com/tutorial-getting-perfect-14-seams/2010/03/11/
I didn't know until last year that there was such a thing as a 1/4" foot. Thanks for sharing your know-how (and your mistakes) with all of us. I have plenty of my own I could share!
Warm regards,
Scarlett Burroughs
Quilting Editor, Craft Gossip
This is great information, Amy! I have been trusting that my 1/4 foot is accurate, so I will have to check it now. Before I had a 1/4 foot and a new machine that would allow the needle to move, I used the tape method and then sharpied the line on my sewing machine which worked fine.
thanks for the details!!!! the 1/4 seam is something that i have always had to be careful of in my work…this will help
Your tutorial is so wonderful and laid out so nicely! I enjoy your perfectionism :-)
Great demo. I am about to teach my first beginning quilting class, and have definitely bookmarked this post to show my students!
Thanks!
This is great! Thank you!!!! I'm just teaching myself how to quit and it's been A LOT of trial and error. Thanks for helping!
I have the star foot, but haven't had a chance to use it much. But, I never thought to measure and see if I am actually getting a perfect 1/4", so will have to try that.
Debbie
I am just starting out with blocks also and have been frustrated. Thanks so much!
Great tutorial!
ttfn :) Yuki
Awesome tip!!!!!
the machine I quilt on is nowhere near as fancy (no digital stuff). I have ended up putting several pieces of tape together and below the plate on the plastic part of the machine (but close enough I can do it accurately), I put the tape so at a certain width I can sew a 1/4" seam. It works for the most part. I'm going to ask for a better machine this year for my birthday however LOL.. just have to keep working with till then.
thanks for this information. very very informative. i didnt know there was a 1/4" foot until i went into my singer store to get other parts. the owner asked what i used my sewing machine for and suggested other items..i'll have to check my accuracy….this is very helpful..
If I only had a new machine (sung to if I only had a brain) I guess they go hand in hand! Thanks for the advice!!
I loved your tutorial because I just recently took a class and my runner was off and I was useing the 1/4 inch foot also. May I ask what machine you have because it looks like mine also? Thank you so much for this info I certainly will use it.
Thanks for this, Amy! I am definitely going to try it.
My problem isn't so much the 1/4" question but rather that I have a hard time keeping my fabric lined up at the beginning and end of seams so they sometimes curve. I think it's the pressure of my presser foot but that doesn't appear to be adjustable.
Hi Amy!!
FINALLY someone talking my lingo!! Thank you so much!! We have the same machine- at least the scene looks the same (Janome) so this is going to be SO helpful!!! Must bookmark this page so that I can find it when I have my machine out…THANKS again!!
Paulette
THANK YOU so much! I had to trim all of my blocks to 9 1/4 instead of the intended 9 1/2. I am gonna figure this out. I am virtually positive that I cannot move my needle since my sewing machine was first used by the Flintstones but that tape idea is a good one.
What a great post – I had been thinking that just by using that foot I was going to be accurate…
Now I can really check things out.
Thanks…
my machine is similar to yours, and I press seams to one side. I get accurate 1/4" seams if I use the 1/4" foot and put the needle at 4.5 :)
Thanks for an awesome tutorial Amy! This is really helpful!
Great post. I had this problem myself and as i don't have a nifty 1/4" foot I just had to work with the setting until I got it right. But now I know the settings to use for a perfect seam.
Great post. I had this problem myself and as i don't have a nifty 1/4" foot I just had to work with the setting until I got it right. But now I know the settings to use for a perfect seam.
My machine is a Janome 4800 – I bought it at allbrands.com and it's my second Janome – my first is 3/4 size, that I got shortly after Joe and I were married. Now a great machine for my girls :)
I use foam tape instead of the blue tape because it gives a little bit of a lip that the fabric can run alongside. I don't put the tape all the way to the feed dogs just close enough that it doesn't interfere with the foot.
funny you posted this! I just realized two days ago that when I switched machines at Christmas, it never occurred to me that my new foot was a different size than my old one. nothing had been affected so far – but I need to adjust it for my next project!
Hello and thank you for posting this. I will read more of it soon. I am trying to learn how to quit..recently took two (what were suppose to be beg quilting classes–one modern quilt and the other log cabin). I was so discouraged in the mod quilt because it was very hard for me to sew 1/4 seam. I am a beginner sewer and am use to 5/8. And the instructor let everyone know throughout the entire class about my not sewing the 1/4 inch.
The log cabin instructor was more understanding–knowing that it takes time AND practice: no way these skills will be mastered in a one day class or in a 2 part class. :-) Thanks again.
Good job! Another example of how a small investment in time goes a long way.
Good job! Another example of how a small investment in time goes a long way.
Good job! Another example of how a small investment in time goes a long way.
FANTASTIC! Thank you! Thank you! Thank you!! :)
Thank you for the tutorial. It was very helpful. I was working on something today that needed the PERFECT 1/4" Seam. This helped me test it out.
oh wow Amy! thanks for the tips. I can't say that I've sewn anything where perfect accuracy is a huge issue, but if I ever do, I will know where to come! I usually just beat my projects into submission :)
Thanks for all the tips! I am a beginning quilter and my accuracy has started to become an issue. I am so going to try this!
This is a great post. I've been wondering how to do this exact thing! Thanks!
Ah Amy, you have solved my problem for me! I have always felt my 1/4 foot is not exact, but never really thought about how to fix it. This is perfect, how simple and yet did any of us think of it? Thanks so much for sharing this Amy xo
I have never even thought about this issue! Wow, I'm totally checking on that today…thanks!
Thanks Amy for this awesome tutorial!!
Lindsay
Thankyou it is so encouraging to read others comments and to know that your not the only duh out there.
fantastic tutorials love your website
Thanks for the tutorial! Now my 20 year old singer is retrofitted with a lovely piece of tape that gives me a perfect 1/4 inch seam!
They don’t even make a 1/4 foot for my machine, so this was very helpful.
Great tute! I’ll try one of these. My machine lets me save settings, so now I’ll make one for 1/4″ seams!
I have one of those feet with the guide on the side, but it doesn’t seem to be accurate at all and is pretty flimsy. Too bad.
Thanks Amy!
Wow – I needed this post like 3 years ago when I decided to make a quilt (with NO supervision, guidance or lessons….) I inherited my ex’s grandmother’s singer that I do believe she purchased in the 1960’s… The block pattern I chose has 28 pieces per block, and I made 26 of the needed 36 blocks……. and they ranged in size from 10 1/2″ (not necessarily square) to 12 3/4…. they are supposed to be 13″ before sewing them all together…….. I just put the blocks in a plastic tote. And that’s where they’ve been until this week. That Singer just could NOT feed the fabric through in any sort of a straight fashion. I tried to mark the 1/4″ on it with tape, but had to take it off when the bobbin ran out. I guess I never got the tape back exactly where it belonged.
I broke down and purchased a new machine a couple of weeks ago. After reading and surfing through a BUNCH of quilting blogs, I got the blocks out and am currently (and carefully) taking them apart…….. piece by piece by piece……. Believe it or not – it is rather therapeutic…….
My new machine is a Brother and it has measurements on it and I bought the 1/4″ foot with the guide piece.
Tonight I will be (carefully) pressing my pieces back into shape and begin sewing them all together again. I can’t wait! And hopefully, I’ll be able to surprise my sister at Christmas.
If things don’t go well, I’ll send smoke signals!!!
Hugs ~~ Suz
inspiringcreativeness.blogspot.com
Wonderful example it will help me out alot. Just started quilting and making and keeping strait lines is killing me. I like your foot with the edge will have to find one that fits my machine.
Great tips. Thank you. A quiltlover from Holland
Thanks for the wonderful tip…will be using it for future projects.
I like to use a stack of Post-It notes on the right side of the pressure foot so I can’t go over…sorta Sewing for Idiots :)
My basic sewing machine has 3 dials and the centre dial is for moving the needle left and right. it has 3 ovals with dots in the left centre then right to show that turning the dial moves the needle. I now discovered that for some reason my needle has moved, could be that I made myself a change purse (with a zipper).
I am making a Seattle street quilt, which requires an exact 1/4 inch. I have discovered that the strips has decreased 1/4 inch in 3 seams! I now realize that I have to recheck the seams every once in awhile, just to save me time. Thought people should every once in awhile re-check to see it hasn’t moved. It doesn’t help that I’m not that consistent with my rotary cutter. lol Yeap a newbie here.
Thanks so much for this tutorial (and others as well)! I am new to sewing, and trying to figure all these things out on my own has been difficult and frustrating. You are helping to make this the “relaxing” hobby and know it can be :)
IF you’re using a machine where you can dial needle position this is great.
I have five different machines I use, and I have one that I can dial. The rest were try, measure, mark, try again, remeasure, remark until I learned for every one where the perfect seam is.
Thank you Amy!! I think it was also you who wrote to check each time I start a project or change my thread. Some threads integrate better and some suck up space. :)
I use a post it note pad instead of painter’s tape. Same effect. :) Thanks again!!!
Have struggled with 1/4 seems for sometime and any help is very much appreciated/ My machine is old so do not have a lot of flexibility with moving the needle to get precise accuracy.
I own a quilt shop and have multiple machines set up. I mark everyone with tape so that no matter what machine is used, the seam allowance is consistant. I may need to sew on different machines depending on who is in my shop working on a project. I recommend this to all my customers. I also reccommend they use the same manufacturer for rulers so measurements are consistent as slight variations occur between manufacturers!
Thanks for the tutorial. Loved it!
It will be very helpful for me.
Hugs from Brazil
One of the places where lotto players can buy Mega Millions lottery tickets
online is Win – Trillions. While shopping online price comparisons is very much important.
here; Fred, But you just need to have a little savvy follow a few rules and have a system in place to happily
spend hours in fruitful chats.
The doctor will give you natural hair loss information on what vitamins that might help with
the problem. Hair loss in women is generally very
gradual, with the rate accelerating during
pregnancy and at menopause. Unlike dryers which emit heat,
these machines emit low-level laser.
Y sí, también posibilita usar WhatsApp desde tu Mac tu ordenador.
It’s very simple to find out any matter on net as compared to textbooks, as I found This Site article at this web page.
Hello I am so excited I found your site, I really
found you by error, while I was searching on Digg for
something else, Anyways I am here now and would just like to say kudos for a marvelous
post and a all round interesting blog (I also love
the theme/design), I don’t have time to browse it all at the minute but I have bookmarked it and also added in your RSS feeds, so when I have time I will be back to read a great
deal more, Please do keep up the fantastic job.
magnificent post, very informative. I’m wondering why the opposite experts of this sector
don’t notice this. You must proceed your writing. I am sure, you’ve a huge readers’ base already!
Humana People to People is a global network of aid agencies from more
than 40 countries on five continents. Forged during the upheaval engendered by the system of Apartheid
in South Africa in the 1970s, Humana recognized that the end of colonialism and Apartheid in 1994 was not the end of suffering.
While they had assisted in winning the fight
for equality in South Africa, there were communities in need
across the globe. The obvious continuation of their program to help people
in South Africa was to extend this aid to the rest
of the world. Thus, Humana People to People was born from
the struggle for basic human rights for all people.
To call Humana People to People an aid agency is to oversimplify its core guiding principles and
its aim when it enters communities. Rather than simply offering aid in the way that one might cover
a wound with a bandage, Humana seeks to transform whole communities, giving them tools that will enable
them to solve their current problems and guard against issues that might arise in the future.
This is a “top down” approach that maintains the only way to aid both
people and communities is to fundamentally change the core elements that keep them from succeedi\
What’s up, always i used to check blog posts here early in the morning, for the reason that i love to find out more and more.
Quality posts is the important to attract the visitors to pay a quick visit the
website, that’s what this web site is providing.
you’re really a just right webmaster. The web site loading speed is incredible.
It sort of feels that you are doing any unique trick.
In addition, The contents are masterpiece. you’ve performed a magnificent activity on this topic!
Consider using baking soda as a means to add some vibrancy to your
hair. To deal with greasy or oily hair, shampoo every other day and just rinse with water on the other days.
Every one of the treatments from Lashem is natural, safe and affordable.
Thanks for the tips on 1/4 seam. My machine has only three settings for the needle and there is little scope to move the needle. I still have difficulty with getting accurate seams but will be trying your tips to see if it will work for me.
WOW just what I was searching for. Came here by searching for games loola
Nice blog right here! Additionally your website lots up very fast!
What host are you using? Can I am getting your associate hyperlink
on your host? I wish my web site loaded up as fast as yours lol
Thank You! I have finally straightened myself out with the 1/4″ seam! I now have some confidence in moving on from little wonky projects to a quilt. I got this!!
The Zune concentrates on being a Portable Media Player.
Dear Amy, I am reading this post 5 years after that you have post it, and although passing 5 years, it is still soooo important and actual, even for an experient quilter because it is always very interesting to see the other quilter’s methods! Thank you sooo much for sharing! Hugs from Brazil!
XO
Sil
Hi Amy do you have any solutions or recommendations on getting a straight 1/4″ at the beginning and end of the seam? Mine seam tends to get narrow at the end like the feed dog is pulling more to the left than the right. Which it is true since there is all fabric going through on the left side and a narrower piece going through the right.
Thank you for the idea of tape placed 1/4″ from needle. My machine is metric and so the increments on the face plate are metric. I thought I had done 1/4″ seems and discovered they are 3/8″. I think I and going to finish the rest of the piecing at 3/8″ to be consistent. I may lose a few inches but I will make it up with wider borders.
Global Message Far this offshoot
Thank you for the great advise.. Glad to see I am not the only one that presses seams open. The only exception is borders I do is I press borders toward the border.
How do you get the subscription bow of your site. It doesn’t move up or down to see if there is an “x” to click. It cuts off part of your information.
Thank you, very helpful since I’m new.