
Updated post with a new video, to walk you through the process 11.25.19 – thanks for stopping by!
Start with a small mitered corner application to gain confidence in making excellent mitered corners every time!
To start gather notions and fabric scraps to practice :

Mitered Corners
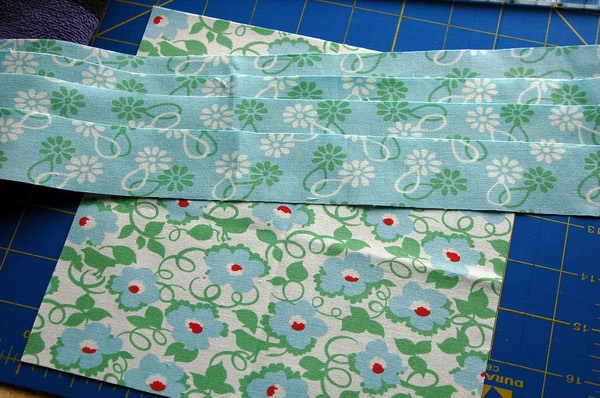
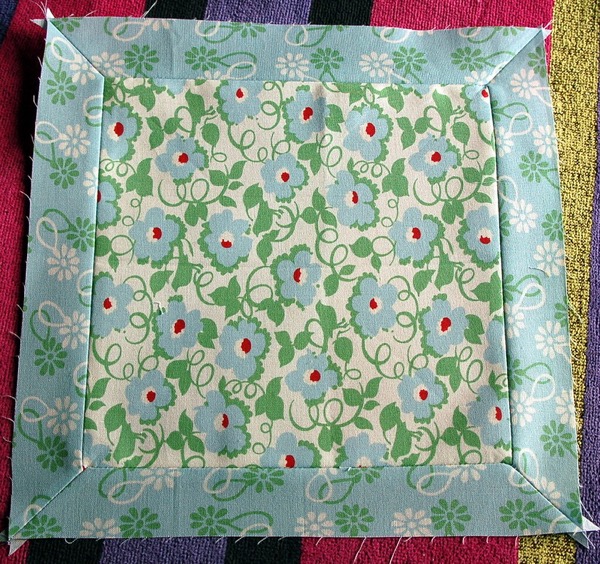
My center square measures 8 1/2″, and the 4 border strips are 1 1/2″ x 12″.
Take special note here: when making mitered corners your strip length needs to be much longer than your square or quilt top, the wider your strip, the more length you need. The formula is the strip length, plus the width times two, and an extra inch or two for seam allowances and peace of mind.
For example: 8 1/2″ + 1 1/2″ x 2 = 11 1/2″ + 1 = 12 1/2″
On with the instructions:
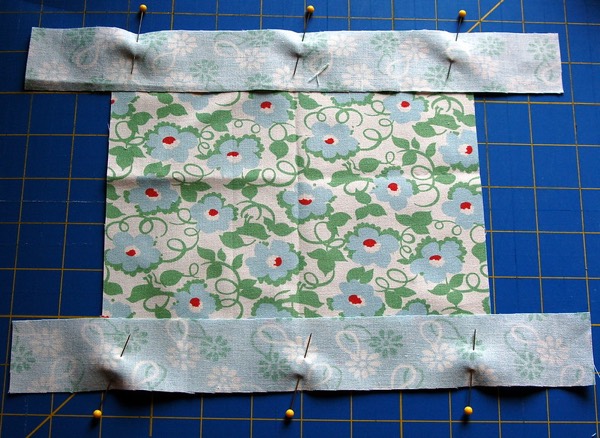
- Pin your strips, center on your square, on opposite sides
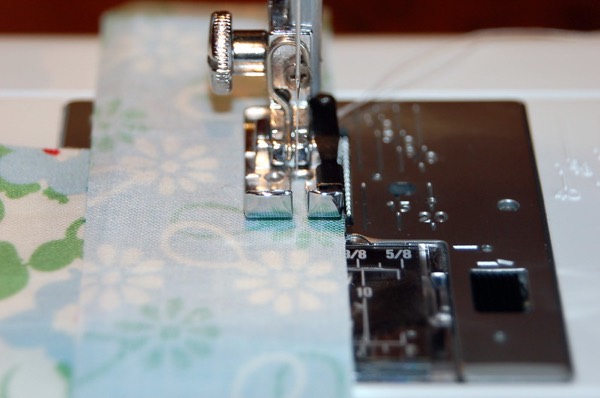
2. Sew with 1/4″ seam, starting and stopping 1/4″ away from the edge of the square. I don’t reinforce my seams at all, it may be helpful to pull out a few stitches when setting the miter. If you need help getting your 1/4″ seam allowance perfect every time – check out my tutorial here.
3. I press the seam allowances open here to reduce bulk in the seam allowances.
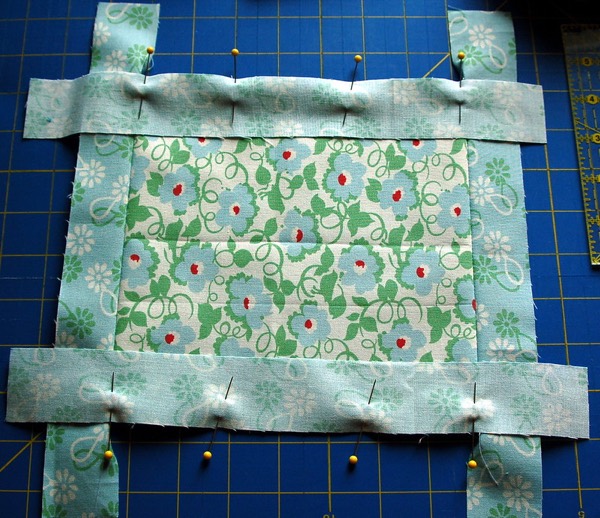
4. Pin and sew opposite sides borders to the square, again starting and stopping 1/4″ away from the edge of the square.

5. Press the seam allowances open.
Mitering Details
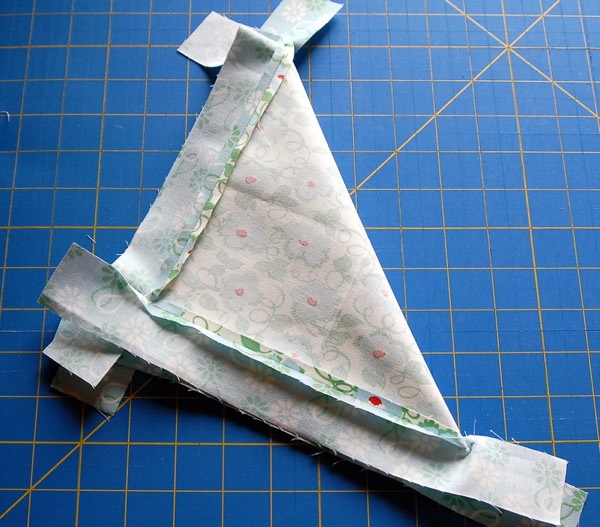
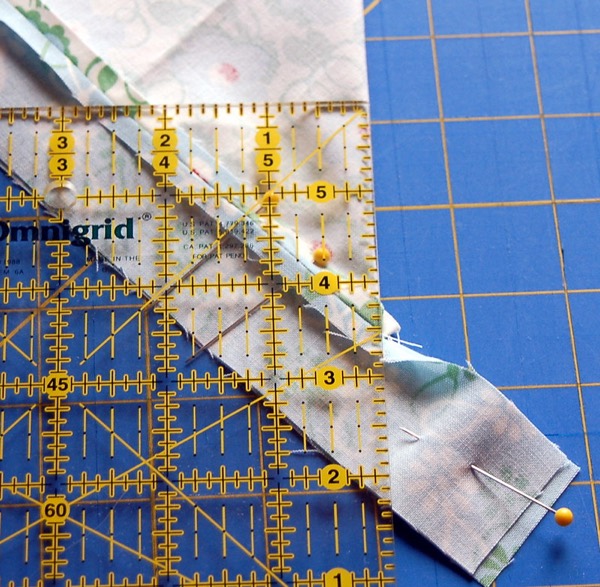
6. Fold your square on the diagonal, this works for rectangles too, take care to work one corner at a time.
7. Match up your seams, making sure that the corner is lying flat without excess, and pin in place.

8. This is how I pin, you don’t want the seams to move, and you need your tails to be secure as well.
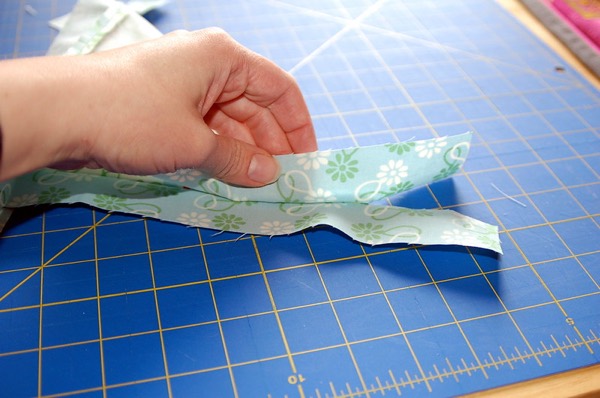
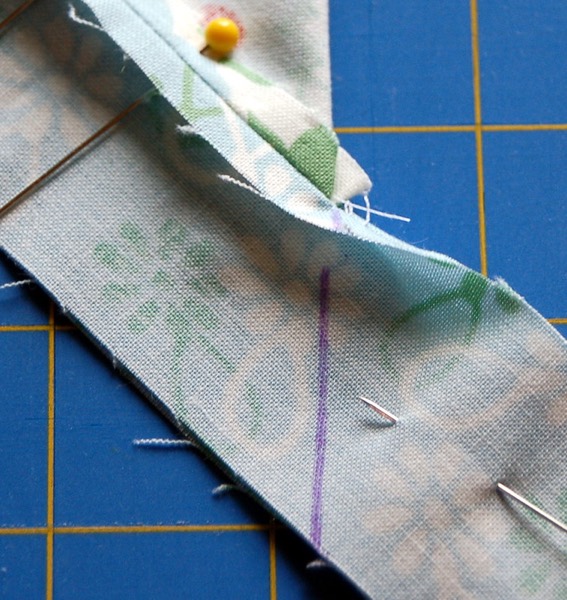
9. You can do both corners at once, flip it over for the opposite corner so that you can sew in the same direction. However, if you are sewing a rectangular piece, I recommend securing one corner at a time.
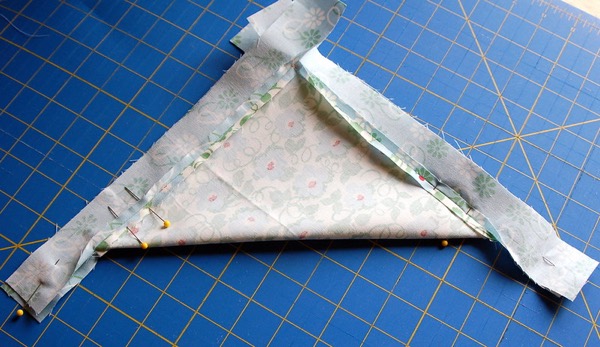
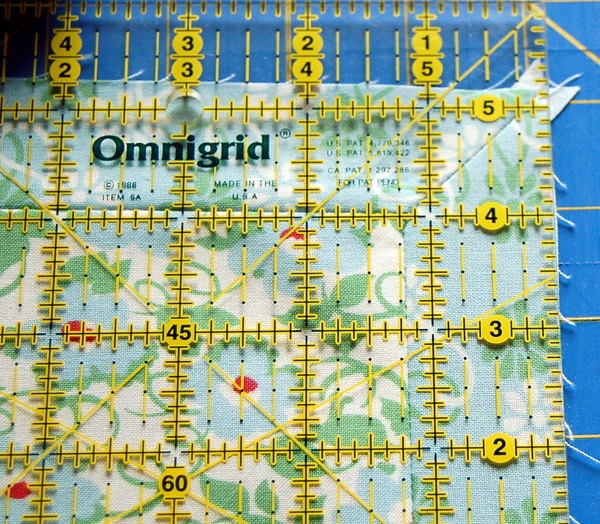
10. Next line up your ruler on the diagonal, and mark the sewing line on the tail, like so —
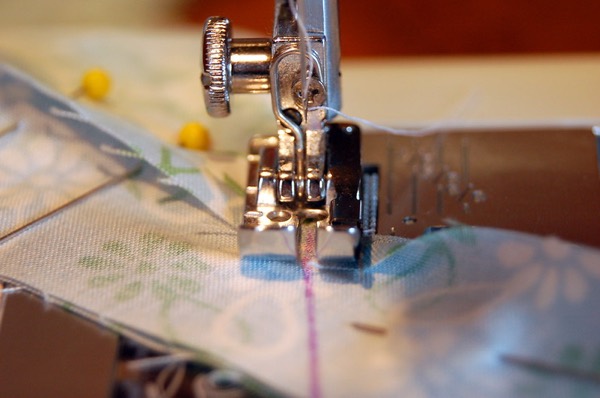
11. Next, sew ON the marked line.
Mitered Results
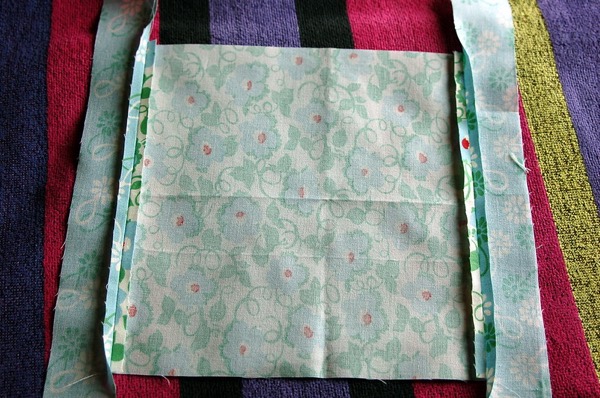
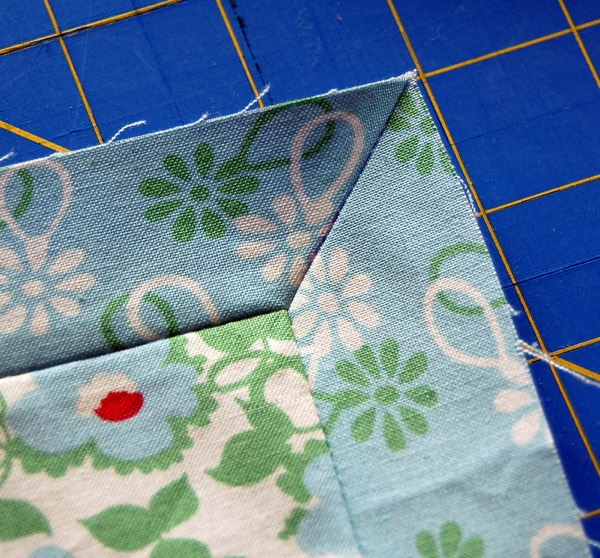
12. Open up your square to double-check your corner.
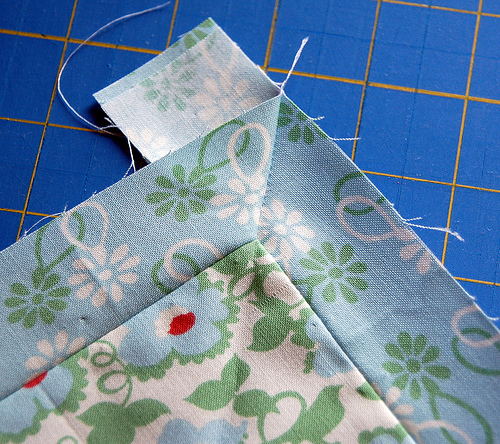
13. If you are pleased, trim to 1/4″ seam allowance, and press, if it’s not quite right use your seam ripper to remove the stitches and try again.
14. Finally, go back to step 7 and 8 to fold on the opposite diagonal and repeat to finish adding miters to all four corners.
15. Use a square ruler or Add-A-Quarter ruler to trim up the excess fabric in the corners.
16. Stand back to admire your handiwork! Those corners look fantastic! Want to make sure your binding has a nice miter too? I have a step-by-step tutorial to walk you through that process – it doesn’t have to be hard!
This method can be used for quilt blocks and borders as much as you like! It adds a great layer of dimension to your finished quilt projects. Just remember to check the formula at the top of the post to cut your strips to the right length.
Let me know if you have any questions and I will do my best to answer them. Have a great weekend!
Amy

Thanks Amy. I’ll bookmark it and perhaps I’ll actually do mitered corners sometime. I have done them in the past…many years ago…with great frustration! I shall not give up.
Thanks for the tutorial! I was kind of envisioning this was the way you made them, but this makes it so much clearer! : )
thanks amy…i’m going to try this for sure…i’ve mitered a few borders, but i like your method better.
Thank you so much for this tutorial. I thought I knew how to do it, but I didn’t.Thanks
This is a great tutorial. It will definitely go into my bookmarks so I can use it as a reference in the future. :)
awesome! I really want to try this on the sashing for my bird quilt! Thank you so much!
Great tutorial! There are so many ways to miter and I love your way. I will have to try this one, it makes a lot of sense. Thanks!
This is a terrific tutorial…I’ve already bookmarked it! My grandmother showed me this method many years ago…but I had forgotten the specifics…so thank you!
Fabulous! Thanks for the awesome tutorial! I’ve always been intimidated by mitered corners, but you make it look so easy!
What excellent work Amy. Thank you. The pictures really explain what you’re doing.
Excellent tutorial Amy – Thanks for taking the time – You make it look so easy :) I am going to try it very soon
OMG Amy! I’ve never seen mitered corners done this way but now I certainly have to try it! Thank-you for this tut!! I’m seriously excited about your mitered corners!
Thanks I have always wanted to learn how to do that. I have bookmarked it. I look forward to giving it a try.
A great tutorial Amy!! Almost makes me think even I could do it :)
I have a question about doing a miter with multiple borders. My quilt top has 4 borders and I am not sure if I need to attach all the borders then do the miter?
With multiple borders…sew the border strips together first then sew to quilt as one piece. Be sure to leave plenty of extra fabric on the ends for mitering. This was from experience. I first did one border at a time but had a hard time matching up the mitered seams.
Thanks for the tutorial! I am going to have to try this. I have always wondered how to go about doing it.
I have never seen this explained so clearly; on top of that, you did a great job with the step-by-step photos and instructions. Congratulations!
Fabulous, Babe!!! great photography; I think I could actually follow your directions if my head was tracking properly…it’s full of oil painting right now and EASTER!!!!Love, hugs and kisses, Mom
What a great tutorial! Thanks for sharing.
Great job with the tutorial, Amy. I love the look of mitred corners, but I’m always scared to try. :) You have given me confidence.
brilliant explanation, I was wondering how to do that (and what it was called)!
Thank you
Thanks for the great tutorial. That sure is so much easier than the way I have been doing mitered corners!
Have a nice day!
Wow! Great tutorial.
Thanks so much for the easy step-by-step instructions!
Kimberly :)
thanks for posting this! This is definitely one tutorial that I’ve never mastered :)
When I try this I will have to print this out and follow step by step.
Thanks Amy for a great tutorial…will have to give it a try.
Oh.. tanks so much for sharing.
Thank you so much. I am making a quilt for a baby shower gift. And I want it to look extra nice. The pictures really help.
I don't ever miter my corners because I've never really known how! So thanks for this tutorial! I hope you don't mind if I share a link to this tutorial on sewwhattoday.blogspot.com on March 4!
Thank you so much…. awesome.
very nice and easy to follow.
That is brilliant, thank you so much. This is like a gillion times easier than the last mitered corner project I did. Thank you thank you!
I totally think I can do this! Thanks so much!
I love the tutorial on mitered corners. Will give it try and let you know how it comes out. Thanks for the tutorials.
Thanks Sharon
This is the easiest way to do mitered corners I have done and I have tried many. I use the formula of “Measure the length of your square plus the width of your boarder doubled”.
Great tutorial. I now will conquer the dreaded mitred corner. Your pdf of instructions will not print. Would like to have a print out – easier to follow at the sewing machine. Thank you.
excelente tutorial es muy bueno saber elaborar las costura perfectas por eso aprendo de las mejores, gracias por compartir saludos desde venezuela……..
the trouble I have is keeping corners mitered while hemming border. Mitered corners look ‘so’ professional and I have so much trouble with them. I guess they’re so simple ; they’re hard.
Thank you very much for this great tutorial! I just tried it for the first time and I am very happy with the results!
Esther
Many thanks for this great tutorial! Found it on pinterest and it will help me a lot in all my future sewing projects ;-)
Have a fabulous week!
Friederike
Thank you very clear great tutorial !
formula for strip lengths is length of side plus 2 x width of strip plus 2x seam allowance. Eg IG block is 6″ and strip will be finished width 1 inch (I.e. 1 and 1/4 cut) then length is 6 + 2 + 1/2 = 8 1/2″
muchas gracias ,
that was very clear thanks
Very nice !!! I’m from Brazil and had learned the cantomitrado in other ways, but your way is great !! I will train. Your works are wonderful !! Congratulations !!!
Thank you so much for this great tutorial.. I’ve never done miter corners but tonight I tried it and it was so easy.. Found it on Pintrest. Thanks again!
Both my son and my youngest daughter are tall–and sleep on XL Twin beds. Unfortunately, ready-made XL twin sheets are extremely hard to find. When I do find them, they’re ugly or plain. I’ve attempted to make twin XL fitted sheets out of nice fabric–but the sheets have been too short on the sides–or the corners didn’t fit right. After reading this tutorial yesterday, I started to wonder if I could use your method for making mitered corners on my XL Twin fitted sheets. What do you think? Thank you for posting this, btw. I really appreciate it! <3
Lisa Peden
http://LisasStitchingPost.com
So easy and I was even too lazy to read the whole thing. I myself tend to be a look at the pictures and wing it kind of gal. Came out beautifully. Thank you so much for teaching this method.
Forgot to mention it was on a king size quilt with a 4″ border.
Hi Amy,
great post, thanks.
I assume this technique will work with borders?? Have you done it?
Thanks
Absolutely it works for borders! I scaled down my sample so it would be easy to photograph :) I’ve used this method many times.
Would this work for quilt edges? I use a folded strip of fabric, sew it on the front of the backed and quilted quilt and then fold it over and sew that side. Could you do your method w/ a folded strip that will then fold over to finish off the edge of the quilt?
thank you very much . it very useful. your tutorial solved my problem…
This is the best method that I have seen. Thank you so much.
excellent instructions! Wish I had these long ago Thank you!
Thank you! With these excellent instructions, I am well on my way to making a beautiful mitered corner quilt.
When you sew the borders on do you leave a 1/4″ unsewn at the corners?
Hi Amy, first time to your creative side, one of the best tutorials I have seen for mitered corners, clear and easy! My mitered corners so far have been “just okay”, but you have really made this soooo easy, so thank you!
Thank you I have been wondering how this was done so simple great directions
Thanks Amy for such a clear description and pictures on how to mitre corners. I have tried 2 other ways but they are a bit hit and miss. I really like this method and think it is much more straight forward.
I have viewed many tutorials on mitered corners. This is the best, explained well with nice pics and easy method. Thank you!
error – first written instruction shows length + width x 12. then it says length + width x 2.
if you look at final picture two miters are good & two are off by a fraction.
video instruction is different from written. video shows you doing top & side while written shows & says to sew opposite sides first. confusing
Thank you,thank you,thank you!!!
Thank you for video on mitered corners. I can see why it is a favorite. Will use your technique on my quilt this evening. I am a jump in girl. No trizies, just do it. Thank you. Am sure it will be wonderful.
Oh my! I can do this! Never tried before but I did it!!! Practiced with a single border then a narrow and wide border, it worked!!! Thank you
Amy,
Thanks so much for this video! I was scared to death to try corners. This helped soooo much! I love that it took it slow and I could do each step and then come back on and see what to do next. I am now interested in doing other quilts. Thanks again.
Thank you so much for this tutorial! I was scratching my head trying to figure it out and this explained it plain and
Simple. Now I can finish the backing for my jelly roll strip quilt for my granddaughter!! Again, thanks!!
Your tutorial was very helpful. Thank you.
I’m no pro but practice makes perfect. The fourth corner came out the best, but other three are presentable.
Just a suggestion in the future, avoid wearing heavy long sleeve sweaters as they get in the way of the view.